How to Draw Shear Diagrams
Shear diagrams are an easy way to visualize shear values along a beam or member and also reveal the maximum positive and negative shear values.
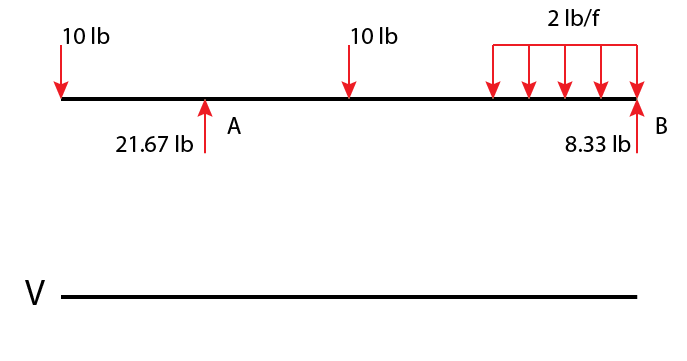
The first step will always be to simplify any and all load distributions into point loads and to solve for all exterior reactions.
Begin the shear diagram by drawing a horizontal line, this is the line for zero shear. I like to draw my shear diagrams directly below the actual member so that they line up and I designate my shear diagrams with a big V.
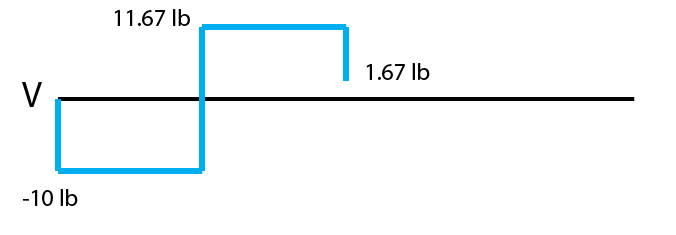
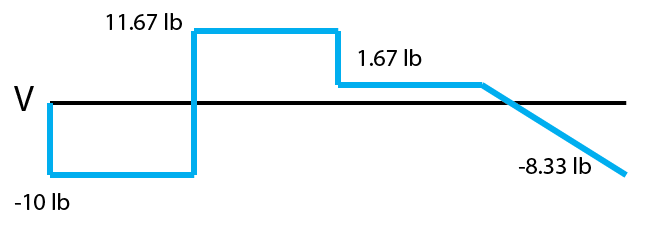
Shear diagrams always begin and end at zero, with all of the forces on the member shown in between. Starting from the left, the first force you come across is the 10 lb downward force at the left end. This is the first point of data, draw a line from zero to negative 10.
Continuing on the next force is 21.67 lb upward at the A support. Extend the line horizontally until it is at A and then add the 21.67 force to it. The shear diagram is now at 11.67 lb on the positive side.
The next force is -10 lb. The shear line will step down from 11.67 lb to 1.67 lb.
The distributed load applies a load at every single point that it covers, so infinitely many shear decreases over any horizontal distance… in other words the line will be sloped. The slope is equivalent to the distributed load, in this case -2 lb/ft.
For speed, calculate the total load (\(5 ft * -2lb/ft = -10lb\)), add the overall increase to the current shear location (\(1.67 – 10 = -8.33lb\)), put a dot at the end result (-8.33 lb) below the end of the distributed load and draw a straight line to it. See note below.
We are now at the endpoint B and luckily our reaction force there is 8.33 lb upward, ending our shear diagram at zero. Right where it should be.
Ending at 0 is actually very important and is a good check that you did not make a mistake. From this completed diagram we can see that the maximum shear is 11.67 lb.
Note: the shear line under a distributed load is linear for a constant distributed load and parabolic for a triangular distributed load.
Posted in Structural Breadth and tagged mechanics, morning breadth, pe exam, shear, shear diagram, shear stress, structural. Bookmark the permalink. 1 Comment.


Leave a Comment
Comments (0)